In Short: Replacing a shower valve can be a DIY project with a few simple steps. First, turn off the water supply to the shower and drain any remaining water from the pipes. Next, carefully remove the old valve using basic plumbing tools, like a pipe wrench, and replace it with the new one by following the manufacturer's instructions. Finally, don't hesitate to seek guidance from online tutorials or consult with a local hardware store for additional support, and remember, with patience and the right tools, you can save money and gain confidence by tackling this project on your own. If all else fails, call your local plumber to finish the project where you left off.
Some savvy Indianapolis homeowners with plumbing knowledge find minor repairs to their plumbing systems within their DIY plumbing skills and don’t always need a professional plumber – shower valve replacement is one job you may be able to do yourself. Our licensed plumbers share DIY tips to help you replace a shower valve at home. Study the instructions found below before you attempt to install a new shower valve, and only perform minor plumbing repairs yourself if you have the knowledge and skill to do so safely and accurately.
If you need a professional plumber to help install a new valve or perform other repairs around your Indianapolis area home, call Mr. Plumber. Our licensed plumbers are ready to assist you with the service you need to improve the function of your home’s plumbing fixtures.
Showers in Indianapolis area homes use a few different types of shower valves to operate. The type of valves in your shower depend on the type of faucets you have installed.
The shower valves in your home can experience problems over time, which require correction to improve the performance of your shower and prevent leaks.
Common issues that affect shower valves, especially an old valve, include:
Issues caused by lime scale and dirt buildup are often remedied when you clean the faucet assembly. This requires removal of the cartridge and other components, which are then soaked in lime remover or vinegar. The assembly must be lubricated and reassembled correctly for the shower valves and faucet to properly function.
First off, if you have a leaky shower, you want to replace a shower valve or install a new valve cartridge to stop this leak as soon as possible. A leaking valve causes significant water waste in the home over time, which increases your utility bills. There is also the risk of an unseen valve leak behind the wall of your shower, which has the potential to cause serious water damage and mold growth.
When you replace shower valves, you gain better performance from your shower. If water temperatures fluctuate in the shower whenever a toilet flushes or other taps throughout the home are in use, a new pressure-balancing valve solves this problem.
Through shower valve replacement, homeowners also gain convenience and safety. Upgrade to a thermostatic valve and preset water temperatures for the shower. A thermostatic valve eliminates the need for finnicky adjustments to achieve the perfect temperature! They also ensure water temperatures do not get too high – this is especially important in homes with small children or elderly family members, as they are at a higher risk of burns and scalds from hot water.
To replace a shower valve, you really need to be an experienced home improvement DIYer. To replace a shower valve is a far more complicated task than changing a showerhead. A good knowledge of plumbing is absolutely necessary to do this job successfully. This project involves making adjustments to the old pipes of your shower, including soldering – do not attempt this project if it is too advanced for your skillset.
That said, if you do not have the skills to replace a shower valve yourself, don’t fret – that’s what your plumber is here for! Mr. Plumber’s licensed plumbers perform repairs like shower valve replacement with ease. We ensure the job is performed correctly to avoid damage to your shower and plumbing.
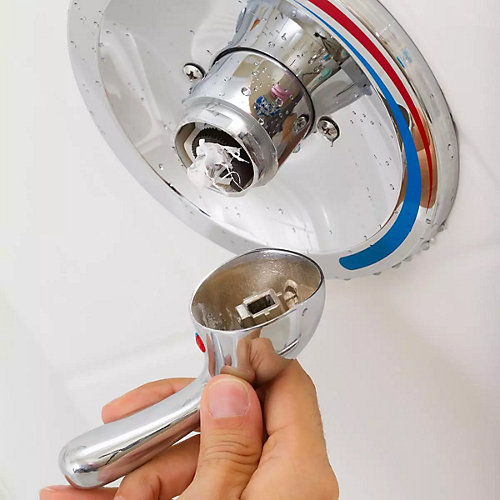
To replace a shower valve, you need to access the plumbing components behind your shower wall. Tools you may need include:
Before you begin to disassemble your shower faucets to replace a shower valve, cover the tub or shower drain with a drain stopper or cloth. You want to completely block the drain opening to prevent any screws or small components from entering the drain.
Some shower valve issues can be resolved when you replace a shower valve cartridge with a new cartridge – simply insert the new cartridge, replace the valve clip, refit, and replace the trim plate then the handle. If the entire shower valve requires replacement, the process is more involved.
As you are able to see, to replace a shower valve requires a certain level of plumbing knowledge and skill. This isn’t a job for everyone – don’t risk leaks and damage to your home if this is not a DIY task you are up for.
Make sure complicated shower valve replacement is done right when you call the pros at Mr. Plumber. Our licensed plumbers repair leaking shower valves and make upgrades for better shower performance in your home. Schedule plumbing repairs when you call us today!